Posts

Showing posts with the label upcycle

Upcycled Pendant from Old Nine West Shoe Jewellery

Image
We're moving all contents to: upcycleliving.blogspot.com Took less than 5 minutes, this is probably the fastest project to date. No one would've guessed its past life if I don't tell. This was the pair of Nine West shoes I bought at a really great promotion price. Loved them, worn them to death - literally.  But I'm not quite ready to part with them completely yet, and the decorative jewels still look good. So before I binned the shoes, I removed the shoe jewellery from both shoes and turned them into pendants. Yes I now have 2 Nine West - so to say - pendants, and why not?

Upcycled Padded iPad Case from an Old Cancer Research Canvas Bag

Image
Since making the  Passport Boarding Pass Holder  from the old Cancer Research bag, my sore fingers have had some good rest so it's time to do something with the remaining material. Using the same method as the  Passport Boarding Pass Holder , I made an iPad case: I've used an old worn out vest (the size was just nice) as the lining,  so that the case will have some kind of padding as extra protection for the iPad. Securing the padding (old vest) with rough running stitch on both ends.   After doing proper back stitching on both ends, fold into half and stitch on both sides. Turn inside out. Unused hair rubber bands stitched under buttons to make loops, then stitch 2 buttons on the other side. In our memory, but now serving even better purposes: The Cancer Research canvas bag before the make over

Upcycled Passport Boarding Pass Holder from Old Cancer Research Canvas Bag

Image
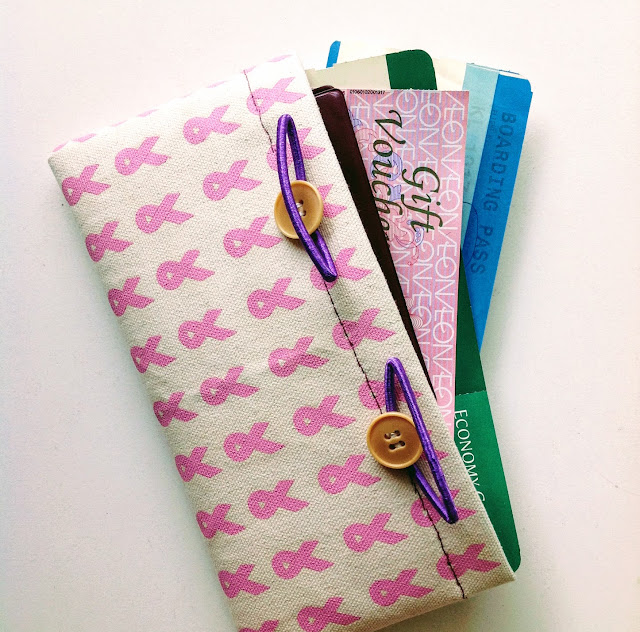
I bought a really nice canvas bag from a Cancer Research shop some years ago. Love it but don't use it enough, mainly because it's a little too flat (no gusset) and I'm a girl with many things. I've been trying, but can't seem to make it more useful than just fitting a couple of thin folders in it. So I had 2 choices: force myself to take it out regularly and let it get dirty, OR, don't use it and let it get dusty and mouldy. Such a dilemma. During my recent travel, I was rather annoyed by the fact that I have nothing in the right size that can house both a passport and a boarding pass. They are either too narrow for the passport or the opening is too short for the boarding pass, and I'm quite skeptical about folding it. After some window shopping/market research trips to the shops, all I could find are either very expensive leather goods, or the cheaper PVC version that won't last a year. I decided that I'd put my little fingers to good use an...

Instant Apron from Old Dress

Image
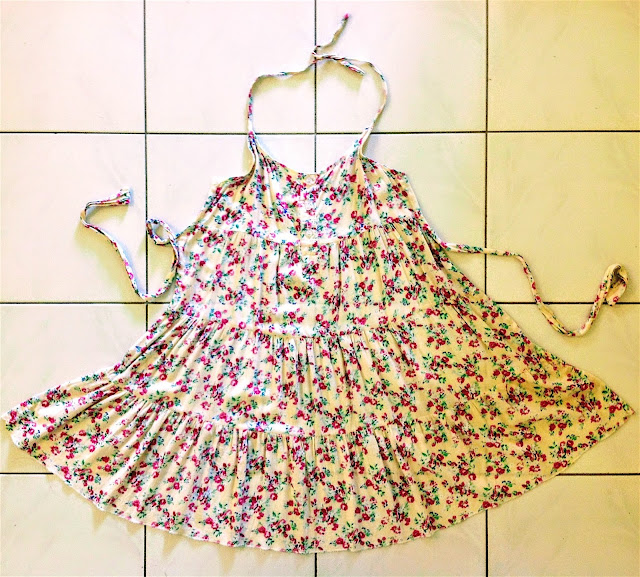
We're moving all contents to a new site If you've come here through an old bookmark, please update accordingly. Looking forward to seeing you at the new  URL   😊   😘 I love aprons: the design, the look, wearing it. But let's face it, aprons are not cheap. And to think that it's something that I wear to block off oil stains and dirt from cooking, it just doesn't make sense to spend money on it. Oh I'm such a stingy hag 😈 This was a sundress I had but worn off over time, and I'd ripped a whole somewhere on the back. Can't give it to charity, didn't want to cut it off into cleaning cloth (not yet), so I had to do something about it, and with it. Since my old apron has become so manky, it deserves a retirement. This old spaghetti strap dress came ready handy as it came ready with 2 attached belts for back tie bow, so all I needed to do was to separate the front and the back (keep the spaghetti straps and belt attached to the f...

Drawstring Bag Knapsack for Exercises, Made from Old Jeans

Image
We're moving all contents to a new site If you've come here through an old bookmark, please update accordingly. Looking forward to seeing you at the new  URL   😊   😘 Body: one leg of old ripped jeans. Straps: unwanted belts that came with two different denim dresses. That's all folks, for I, is off for a walk. 🏃

Upholstery for iPad Holder

Image
We're moving all contents to a new site If you've come here through an old bookmark, please update accordingly. Looking forward to seeing you at the new  URL   😊   😘 I have a PVC tablecloth which I bought from one of my favourite stores - Daiso for £1 some time ago (I was planning to cover up the old book shelves but never got around to doing so) so I thought I'd use that for my little experiment. I've used a PVA glue and spread it all over the iPad case/holder evenly, especially the ripped part, carefully pressing any sticky-outy bits down to make the surface as flat as possible. Using a damp piece of cloth or tissue, slowly rub the material down in an outward direction, to minimize the forming of air bubbles so that the surface is as smooth as possible. Then apply PVA glue to the excess tablecloth around the sides, "hem" it down to give the case a finishing wrap. To secure the "hem", I used some clothes ...

Upcycled Wine Cork Trivet

Image
We're moving all contents to a new site If you've come here through an old bookmark, please update accordingly. Looking forward to seeing you at the new  URL   😊   😘 Just when I was about to give up and decide to clean them out, I caught a glimpse of a trivet made of wine corks in the background of a TV show. Obviously this is not an original idea and surely there must be others who've already done so, but hey I managed to use up all the corks and turned them into something useful - that's good enough for me. Most importantly: I get to keep them, not bin them ;)

What to do with damp stained shirt

Image
We're moving all contents to a new site If you've come here through an old bookmark, please update accordingly. Looking forward to seeing you at the new  URL   😊   😘 This cushion cover is made from one of my husband's old shirts, which unfortunately had been damp stained on the collar due to the highly humid weather. We can't give it away to the charity and the material is not suitable for cleaning. I was meant to upcycle it into a wrap dress but was too lazy to do so. Whilst I was staring into the buttons the idea just came to me. It was so simple: Just lay the shirt flat, buttoned, turned inside out. Mark out the square (whatever size fits your cushion) where the button panel will fall in the middle. Secure with pins or quick stitches, cut the excess material out and sew it all around. (I did it by hand as I don't have a sewing machine) Unbutton and turn inside out. Now you have a cushion cover with ready button fastening. We probably ...