Posts

Ripped Trousers, Rescued

Image
We're moving all contents to a new site If you've come here through an old bookmark, please update accordingly. Looking forward to seeing you at the new  URL   😊   😘 Here's one of those tasks that I get given by my husband from time to time: fix it! He loves these trousers so much that he wears them again as soon as they get cleaned. And look what happened? The cloth at the waist band is all ripped. There is such a big hole that can't just be sewn back with threads. Also, the print is a very specific camouflage pattern which means that I can't just take any excess cloth and patch it on. But since the back pockets are mainly for decoration purposes, the rescue is here! I took the left back pocket out stitch by stitch very carefully so that I don't leave yet another hole behind. After a little ironing to get rid of the creases, I now have enough material to patch the waist band back. (It's like how they take a bit of the buttock s...
Refashion Depeche Mode T-shirt

Image
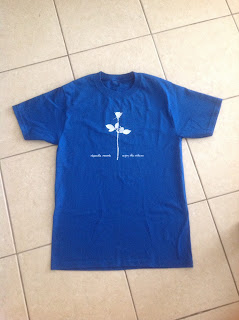
We're moving all contents to a new site If you've come here through an old bookmark, please update accordingly. Looking forward to seeing you at the new  URL   😊   😘 I was given this Depeche Mode T-shirt months ago, but can't bring myself to wearing it as it is still too big although it is an S. Wearing it to bed is completely out of the question because that would have been a blasphemy! I've been wanting to do some alteration so that I can enjoy wearing it and finally found the time to do so last week. And here's what I did: outline the shape of my desired outcome, cut away the unwanted part of the material then hem the sides up (all hand-stitched, no cheating). And this is what I can finally put on and walk out the door, proud :)

Old Dress to New Top

Image
We're moving all contents to a new site If you've come here through an old bookmark, please update accordingly. Looking forward to seeing you at the new  URL   😊   😘 I hate parting with old clothes, especially designs that don't come easy. This long dress has been with me since the late 90s, but lately the stretchiness of the material is gone and it is not tight-fitting any more. I can hear it calling out to me: "Please don't throw me away, please, no!" So here comes the scissors and the needle and threads. I cut the dress across the waist and sewed the hem and made it into a top. Then I dug out a pair of Chinese buttons I savaged from another old top which I had to bin (because the material was falling apart), and voila, I got myself a new Chinese Cheong-sum-like top! As for the bottom part of the dress? I've yet to decide what to do with it, but rest assured, it will be something useful :-)

Christmas Tree from old Christmas Crackers

Image
We're moving all contents to a new site If you've come here through an old bookmark, please update accordingly. Looking forward to seeing you at the new  URL   😊   😘 It's that time of the year again - you're right - time to get busy preparing for Christmas! And what can be more fun than getting the tree up? As usual, the rules here is to have nothing (or very little) bought. Everything must be old, used, or recycled. We had a great success last year with our CD Christmas tree , and the CDs were then stored away for their future use in God-knows-what; maybe rebuild the same tree, who knows? But this year we're going to be away for the holiday so we'll just have something really simple and doesn't require much work. As I was going through my craft boxes, I found this stack of beautiful glossy cardboard that used to be the body of some Christmas crackers we used last year (yes I actually saved those bits). Was initially thinking of making som...

Christmas Stockings from Old Oven Gloves

Image
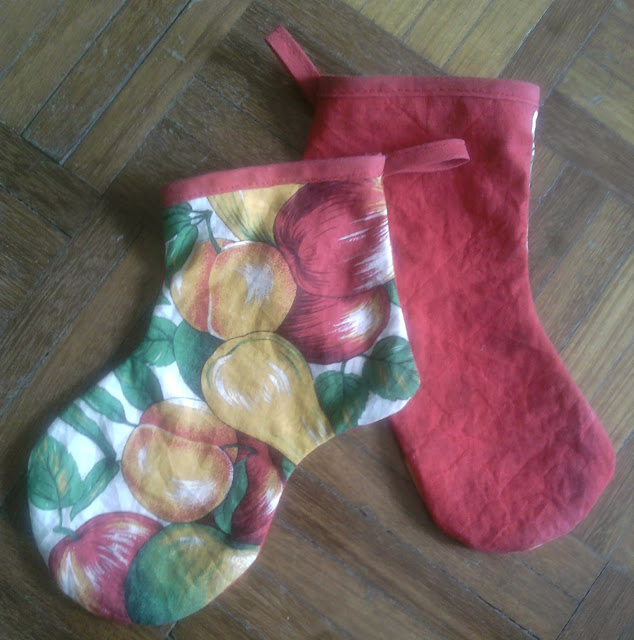
We're moving all contents to a new site If you've come here through an old bookmark, please update accordingly. Looking forward to seeing you at the new  URL   😊   😘 Here are the oven gloves-turned-Christmas stockings: Here is what they looked like before: Being taken apart for cutting: Nothing's wasted!

DIY WIne Glass Charms

Image
We're moving all contents to a new site If you've come here through an old bookmark, please update accordingly. Looking forward to seeing you at the new  URL   😊   😘 We like throwing small dinner parties and enjoy some home cooked food and nice wines - with proper crockery and cutlery - NO disposable ones! But having to keep washing up and drying wine glasses is a pain, especially when everyone seems to get their wine glasses mixed up and decided to get a fresh one. If only we can have something to individualise each wine glass, but obviously not buy putting a horrible looking sticker label over the glass. When I first saw this brilliant product at a department store, I knew that's what I need to add to our wine accessories - some wine glass charms! But they aren't cheap; in fact, they are really expensive! Minimum RM50 for a box of 6 or 8 charms, and that's all you can get: just the 6 or 8 different designs. That's when I decided to make our o...

Fruit Packaging Nets Craft Apples

Image
We're moving all contents to a new site If you've come here through an old bookmark, please update accordingly. Looking forward to seeing you at the new  URL   😊   😘 No matter how hard we try to buy everything in the least packaging, we somehow still end up with quite a bit that we can't avoid. These net packaging came with some of the potatoes and onions that we bought from our local store, when we had absolutely no choice but to get them. Over time, we've collected quite a few and here's what I've done with them instead of throwing them away: 1. After cleaning thoroughly, fold the net opening out- and downward. 2. Keep folding down, as if rolling down a sock. 3. When fold till the end, turn it up-side-down and we'll get what looks like an apple. I learned to do this from my sister who brought the craft home from her preschool one day years ago. It is extremely easy and fun to do, and they are now in my 6 year-old niece's toy fruit...