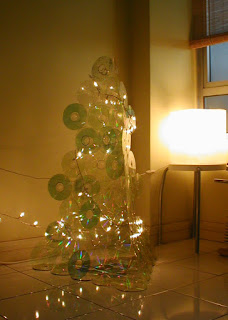
CD Christmas Tree
We're moving all contents to a new site
If you've come here through an old bookmark, please update accordingly.


And after a few trials and errors, my transparent, 100% reusable CD Christmas tree is born. This is a 3-tier (each triangular pine tree shape is a tier) size but I can reshape and resize the tree the way I like it next year. I did peel off the shiny coating layer of the CDs before I constructed this, but if you would like to try one yourself, you can also opt to leave the shiny bits on, like what a friend of mine did to her version of CD Christmas tree:

Here is the step-by-step guide to making a simple Christmas tree out of old unwanted CDs:
Step 1: Arrange CDs into the shape of a tree, secure each adjoining point with cellophane tapes (make sure you tape on both sides). Make 3 sets of this.
 Step 2: Base on the number of CDs used on the bottom row of step 1, make a triangular base like this, with the same number of CDs on each side. Secure with tapes like in step 1.
 Step 3: Join the tree shapes by the base with each side of the triangle shape (indicated by the red marks). Secure with tapes like in step 1, but with even stronger tapes or stick a few more layers. And to make sure the tree structure is strong enough, stick more CDs on joining points to prevent the tapes from breaking up (shown below as white CDs). The reinforcement CDs should be facing the inside of the tree.
Step 4: Hold up the tip of each side and join them by point X (you'll need someone to help you hold this whilst you stick the sides together). Secure as many touching point as possible with cellophane tape to make the tree as stable.
 Material:
 Old CDs that you have no idea what to do with. I've used 120 CDs (3x27 for the tree shape, 24 for reinforcemnet and 15 for the base).
Some cellotapes. No drilling, no glue.
Tools: Your hands and 1 more pair of hands.
The 2-D foldable one? It's still very much alive on one of the walls.
Merry Christmas everyone!


I now know what to do with my old CDs, thanks!
ReplyDelete